You know the drill. Someone emails you: “Can we meet Tuesday at 3pm?” You open a new tab. You Google “PST to EST.” You triple-check the math. You convert it to your time zone. You send a tentative reply. Then you realize you forgot to account for daylight saving time.
Time zone math is tedious. It slows you down. And when you get it wrong, it’s embarrassing.
Here’s how to add multiple time zones to Google Calendar so you never have to Google a conversion again.
How to Add Multiple Time Zones to Google Calendar?
If you work with people across different time zones, you’re constantly asking yourself: “What time is it there? Is 2 PM my time or their time? Are they even awake right now?”
Adding multiple time zones to your Google Calendar solves this. You see all the time zones you care about side by side. No mental math. No tab switching. No errors.
This gives you instant visual clarity on when everyone’s available, eliminates time zone conversion mistakes, and saves you from the constant back-and-forth of confirming meeting times.
Method 1: Add a Secondary Time Zone in Google Calendar Settings
This is Google Calendar’s built-in way to display a second time zone in your calendar view. It shows two time zones side by side whenever you look at your calendar.

Step 1: Open Google Calendar on your computer. Go to calendar.google.com and make sure you’re logged into your Google account.
Step 2: Click the gear icon in the top right corner. This opens your settings menu.
Step 3: Select “Settings” from the dropdown menu. You’ll see a full settings page with options in the left sidebar.
Step 4: Look for “Time zone” in the left sidebar. Click on it. You’ll see your current primary time zone listed.
Step 5: Scroll down until you see “Display secondary time zone.” Check the box next to it.
Step 6: Click the dropdown menu that appears. Browse through the list organized by regions and time zone codes to find the time zone you want to add.
Step 7: Optional: Add a label. There’s a text field where you can name this time zone. For example, if you’re adding London time, you could label it “UK Team” or “Client Time.”
Step 8: Click back to your calendar view. You’ll now see two time zones displayed side by side in your calendar grid.
Limitations of this method:
- You can only display two time zones at once. If you work with teams in New York, London, Singapore, and Sydney, you’re limited to picking just two.
- You cannot add time zones directly from your calendar screen. You must navigate to Settings, find the Time Zone option, enable the secondary time zone, and only then will it appear in your calendar grid. This takes multiple clicks every time you want to change a time zone.
- There’s no search functionality. You have to scroll through a dropdown menu organized by regions and time zone codes. You can’t simply type “Tokyo” or “Berlin” and find it instantly. You need to know which region it falls under or what the time zone code is.
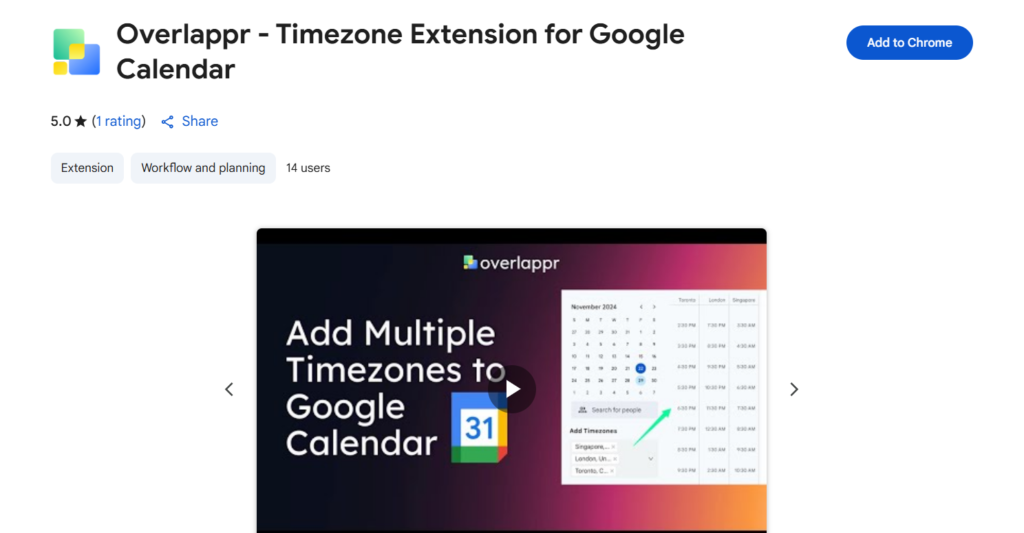
Method 2: Use Overlappr to Add Multiple Time Zones (Recommended)
If you need to see three, four, or more time zones at once, or if you want a faster way to manage time zones without leaving your calendar screen, Overlappr is the best option.
Step 1: Install the Overlappr Chrome extension. Go to the Chrome Web Store, search for “Overlappr,” and click “Add to Chrome.” Takes about 30 seconds.
Step 2: Connect your Google Calendar. The extension will ask for permission to access your calendar. Click “Allow.”
Step 3: Open your Google Calendar. You’ll now see the Overlappr sidebar on the right side of your calendar.
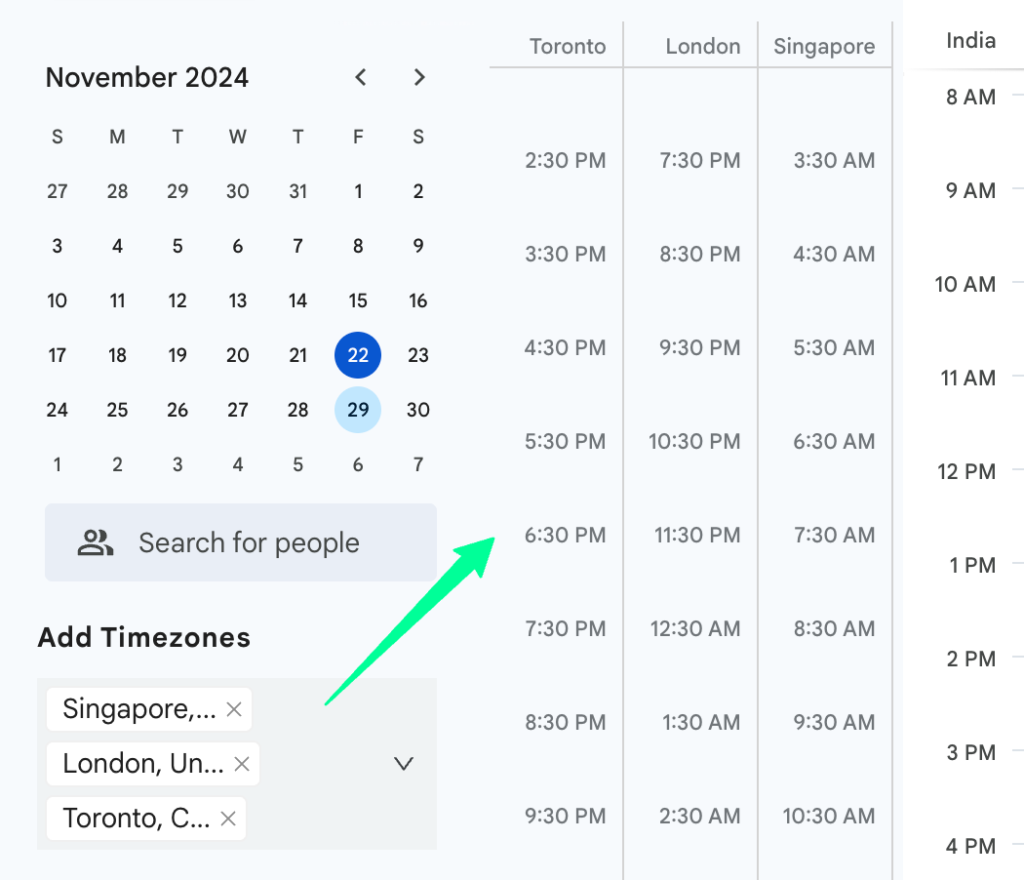
Step 4: Add any time zone by typing a city name. Just type “Tokyo” and Tokyo time appears. Type “Berlin” and Berlin time appears. No need to remember time zone codes or browse through dropdown menus.
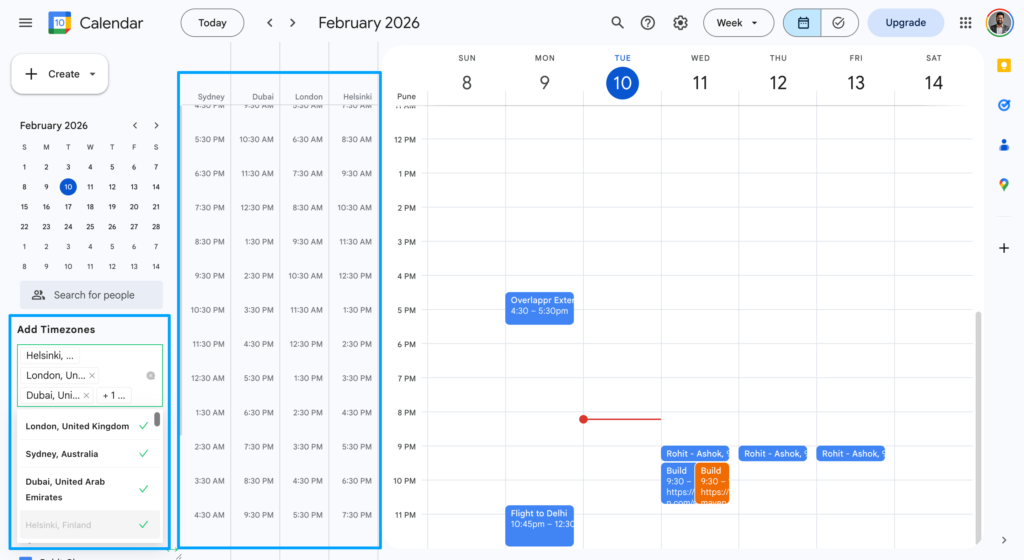
Step 5: Add as many time zones as you want. Unlike Google Calendar’s native feature that limits you to two time zones, Overlappr lets you add as many as you need. If you work with teams across six continents, add all six.
Step 6: See all your time zones overlaid on your calendar. Every time zone you added appears in your calendar sidebar, lined up with your actual calendar events. You can instantly see “It’s 3 PM for me, 8 PM in London, 11 PM in Singapore.”
Why using Overlappr is the best solution:
No time zone code memorization.
You don’t need to know that Singapore is “SGT” or that Berlin is “CET.” Just type the city name. Overlappr figures out the rest.
Search by city name instantly.
There’s a search option where you can type any city name and select it. No scrolling through regional dropdowns. No guessing time zone codes.
Add unlimited time zones.
Not just two. Add every time zone you care about. If you have calls scheduled across five different countries this week, add all five time zones.
See time zones directly on your calendar grid.
Overlappr overlays the time zones right on your calendar events, so you see exactly when meetings happen in every time zone. No separate widget. No leaving your calendar screen.
Share available time slots in just three clicks.
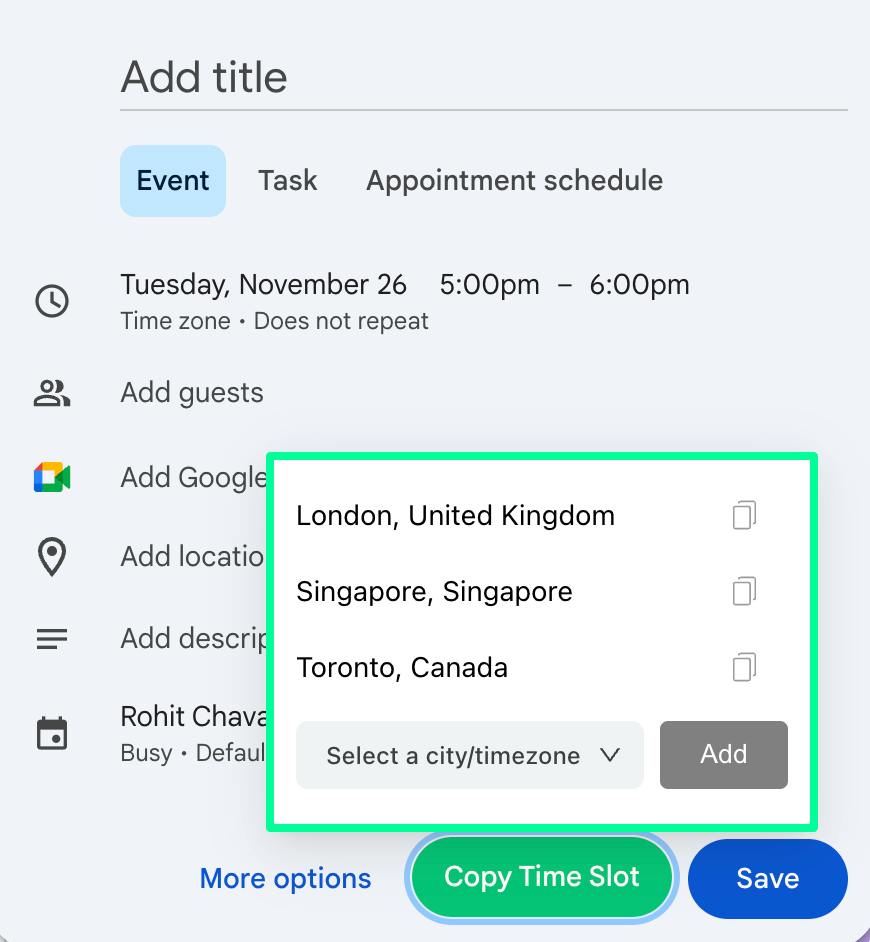
Need to share your availability in someone else’s time zone? Select your free slots, pick their time zone, and copy. Done in three clicks. No manual conversion. No errors.
Join meetings in one click from your browser toolbar.

Click the Overlappr extension icon in your Chrome toolbar and see all your meetings for the day. Click on any meeting link to join instantly. No need to open your calendar, find the event, scroll to the meeting link, and then click. Just one click from the toolbar.
Auto-detect date and time proposed in Gmail.
When someone emails you “Can we meet on February 15th at 3 PM PST?”, Overlappr automatically detects the proposed date, time, and time zone. You can see conflicting meetings right inside Gmail and check your available time slots without ever leaving your email. No tab switching. No manual checking.
Overlappr is free to try, and if you schedule across time zones regularly, it pays for itself in time saved within the first week.
Method 3: Create Events in Different Time Zones
Sometimes you need to create a single event in a different time zone. Maybe you’re traveling, or maybe the meeting is happening in someone else’s time zone. Here’s how to do that with Google Calendar’s native functionality.
Step 1: Click the “+ Create” button or click any time slot on your calendar to create a new event.
Step 2: Enter the event details. Add the title, date, and time as usual.
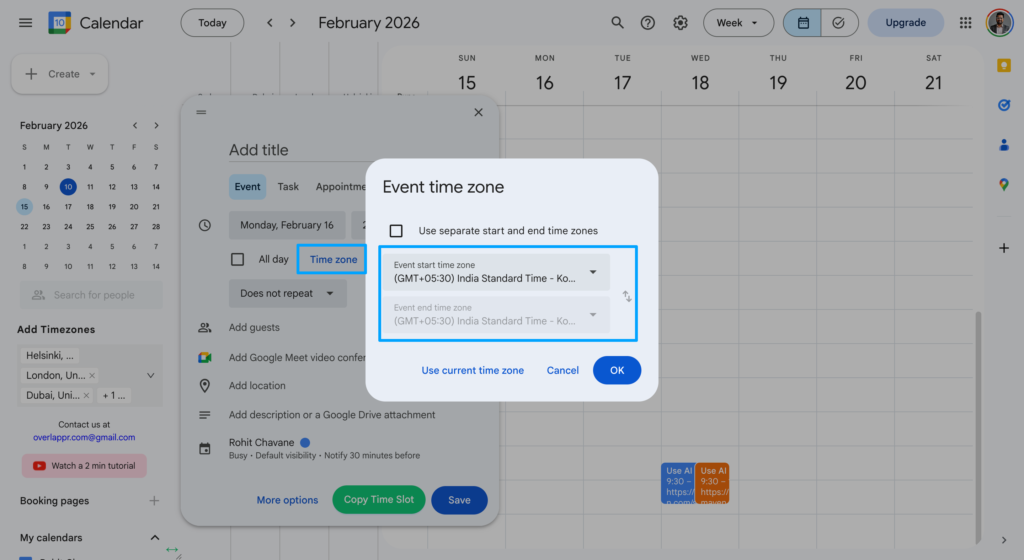
Step 3: Look for the time zone selector next to the time. It’s usually shown as your current time zone (like “Eastern Time” or “Pacific Time”). Click on it.
Step 4: Search for the time zone you need. Type the city name or time zone code. Select the correct time zone from the dropdown.
Step 5: Save the event. Google Calendar will automatically convert this event to display in your primary time zone in your calendar view, but the event itself is stored in the time zone you selected.
This is useful when you’re scheduling a meeting that needs to happen at a specific time in a specific time zone. For example, if your client says “Let’s meet at 10am Sydney time,” you can create the event in Sydney time and Google Calendar will show you when that is for you.
Note: This method doesn’t add an actual time zone display to your calendar. It just creates individual events in different time zones. If you’re coordinating meetings across time zones daily, this gets tedious fast.
Method 4: View World Clock in Google Calendar
Google Calendar also offers a world clock feature that shows multiple time zones at once. This is helpful when you need a quick reference for what time it is in different locations.
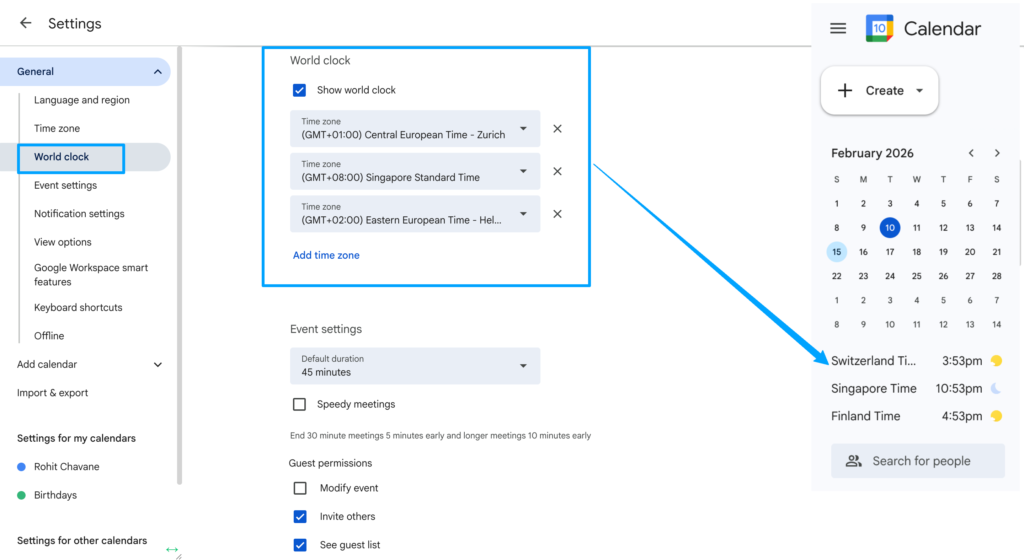
Step 1: Open Google Calendar settings. Click the gear icon, then “Settings.”
Step 2: Find “World Clock” in the left sidebar. Click on it.
Step 3: Check the box that says “Show world clock.”
Step 4: Add the time zones you need. Click “Add time zone” and search for cities or time zone codes. You can add as many as you need.
Step 5: Return to your calendar. You’ll see a small world clock widget in your calendar sidebar showing the current time in each time zone you added.
Note: The world clock doesn’t integrate into your calendar grid. It’s just a small widget that shows what time it is right now in different places. It gives you a hint about current times but doesn’t help you see when your specific meetings are happening in other time zones. It’s a quick reference tool, not a scheduling tool.
Pro Tips for Managing Multiple Time Zones in Google Calendar
1. Use city names instead of time zone codes.
When adding time zones, search for “London” instead of “GMT” or “New York” instead of “EST.” Cities automatically adjust for daylight saving time, while time zone codes don’t. This prevents errors twice a year when clocks change.
2. Label your secondary time zones clearly.
Instead of “Pacific Time,” use labels like “SF Office” or “West Coast Team.” This makes it instantly clear why you’re tracking that time zone.
3. Keep your primary time zone as your home time zone.
Even if you travel frequently, keep your calendar’s primary time zone set to where you live. Create individual events in different time zones as needed. This prevents confusion when you return home.
4. Add time zones for your most frequent contacts.
If you work with the same people regularly, add their time zones permanently. If you only schedule with someone occasionally, create one-off events in their time zone instead of adding it permanently.
Common Mistakes to Avoid
Forgetting about daylight saving time. Different countries change their clocks on different dates, and some don’t change at all. Always double-check meeting times during March, April, October, and November when changes happen.
Assuming everyone uses the same time zone abbreviations. “CST” could mean Central Standard Time (US), China Standard Time, or Cuba Standard Time. Always specify the city or use the full time zone name.
Not updating time zones when traveling. Don’t change your calendar’s primary time zone when traveling. It confuses your recurring meetings and makes scheduling harder when you return home.
Adding too many time zones with Google Calendar’s native method. With Method 1, you’re limited to two time zones. Don’t try to work around this by constantly changing which two you display. Use Method 2 (Overlappr) instead if you need more than two.
Stop Googling Time Zone Conversions. Start Using Overlappr.
Adding multiple time zones to Google Calendar shouldn’t be complicated. You shouldn’t have to navigate through settings menus, scroll through dropdown lists, or memorize time zone codes.
With Overlappr, you type a city name and the time zone appears on your calendar. You see all your time zones at once. You share your availability in any time zone with three clicks. You join meetings in one click from your browser toolbar. And when someone proposes a meeting time in Gmail, you see your conflicts and availability without leaving your email.
Try Overlappr free for 14 days. No credit card required. If you schedule across time zones even once a week, you’ll save hours of frustration and eliminate time zone conversion errors completely.
Add Overlappr to Chrome – Start Your Free Trial Now!
Frequently Asked Questions
How many time zones can I add to Google Calendar using the native method?
Google Calendar’s native settings allow you to display only two time zones at once: your primary time zone and one secondary time zone. If you need to see three or more time zones simultaneously, you’ll need to use a Chrome extension like Overlappr, which lets you add unlimited time zones to your calendar sidebar.
What’s the difference between adding a time zone to my calendar vs. creating events in different time zones?
Adding a time zone to your calendar (Method 1 or Method 2) creates a permanent display that shows you what time it is in that time zone at all hours. Creating events in different time zones (Method 3) just sets the time zone for that specific event. The first option is better when you regularly work with people in specific time zones. The second is better for one-off meetings in time zones you don’t normally track.
Will time zones automatically adjust for daylight saving time?
Yes, time zones will automatically adjust when daylight saving time starts or ends.